

Whether you’re building a simple to-do list, a user dashboard, or a complex admin panel, there will likely come a time when you need to display data in an interactive and editable format. One of the most effective ways to do this is through an HTML table.
But what if your data isn’t static?
That’s where dynamic HTML tables come into play. By using JavaScript, you can create, update, and delete table rows and columns in real-time, all without refreshing the page.
In this comprehensive guide, we’ll show you how to create a dynamic HTML table using JavaScript, including step-by-step instructions, clean code snippets, and real-world use cases.
Table of Contents
What is a Dynamic HTML Table?
A dynamic table is an HTML table that can be modified at runtime. Unlike a static table, which is hardcoded in HTML, a dynamic table allows you to:
- Add new rows or columns on the fly
- Edit existing data
- Delete rows dynamically
- Populate data from JavaScript arrays or external APIs
Dynamic tables are commonly used in:
- Admin dashboards
- CRUD applications
- Inventory management systems
- Student or employee record lists
- Custom data entry forms
HTML Structure For Creating a Dynamic HTML Table Using JavaScript
Learn how to create a dynamic HTML table using JavaScript to display data.
<!DOCTYPE html>
<html lang="en">
<head>
    <meta charset="UTF-8">
    <meta name="viewport" content="width=device-width, initial-scale=1.0">
    <title>Make a Dynamic Table Using HTML,CSS,Javascript</title>
    <link rel="stylesheet" href="table.css">
    <link rel="stylesheet" href="bootstrap.min.css">
    <script src="table.js"></script>
    <script src="jquery.min.js"></script>
</head>
<body>
    <div class="container">
        <div class="row">
            <div class="col-sm-12">
                <div class="make-dynamic-table-input">
                    <label for="table-row-id">Enter Row Number</label>
                    <input type="number" id="table-row-id" placeholder="Row Number"
                        name="table_row" class="table-row-class" required />
                    <label for="table-col-id">Enter Col Number</label>
                    <input type="number" id="table-col-id" placeholder="Col Number"
                        name="table_col" class="table-col-class" required />
                    <button type="button" id="create-btn" onclick="tableCreate()">
                        Create a Table
                    </button>
                </div>
                <div class="display-dynamic-table">
                    <table class="dynamic-table">
                    </table>
                </div>
            </div>
        </div>
    </div>
</body>
</html>Code Explanation of HTML
- HTML Structure:
- Head Section:
Theheadcontains links to styles and scripts: - Body Section:
The layout uses Bootstrap’s grid system to organize the content. Input fields allow users to specify rows and columns, and a button triggers the table creation function.
- Head Section:
- User Inputs:
- Two inputs accept numbers for rows (
table-row-id) and columns (table-col-id). - The “Create a Table” button calls the
tableCreate()function when clicked.
- Two inputs accept numbers for rows (
- Table Display:
- The table is dynamically generated within a
divwith thedynamic-tableclass, making it easy to apply custom styles or additional functionality.
- The table is dynamically generated within a
External Resources:
- Bootstrap: The page uses Bootstrap for its layout and design.
- jQuery: The jQuery library simplifies JavaScript coding for events and DOM updates.
CSS Code For Creating a Dynamic HTML Table Using JavaScript
.dynamic-table {
    width: 100%;
    border: 1px solid #ccc;
    border-collapse: collapse;
    margin-top: 20px;
}

.dynamic-table th,
.dynamic-table td {
    border: 1px solid #ccc;
    padding: 8px;
    text-align: center;
}

.dynamic-table th[contenteditable="true"],
.dynamic-table td[contenteditable="true"] {
    outline: none;
}

.dynamic-table th {
    background-color: #f2f2f2;
    font-weight: bold;
}

button#create-btn {
    padding: 8px 16px;
    background-color: #007bff;
    color: white;
    border: none;
    cursor: pointer;
}

button#create-btn:hover {
    background-color: #0056b3;
}

.make-dynamic-table-input label {
    margin-right: 10px;
    font-size: 16px;
}

.make-dynamic-table-input input {
    margin-right: 10px;
    padding: 5px;
    font-size: 14px;
}
CODE EXPLANATION OF CSS
1. Dynamic Table Styling:
.dynamic-table:- Sets the table to take the full width of its container (
width: 100%). - Adds a border (
1px solid #ccc) around the table and collapses borders to create a cleaner look. - Adds a
margin-topof 20px for spacing above the table.
- Sets the table to take the full width of its container (
.dynamic-table th, .dynamic-table td:- Adds a border around each cell (
1px solid #ccc) for a clear grid layout. - Sets padding of 8px for better spacing inside cells and aligns text to the center.
- Adds a border around each cell (
- Editable Cells:
- For editable cells (
contenteditable="true"), the outline is removed for a seamless user experience.
- For editable cells (
- Table Header:
- Header cells (
th) have a light gray background color (#f2f2f2) and bold text to distinguish them from data cells.
- Header cells (
2. Button Styling:
button#create-btn:- Creates a visually appealing button with padding (
8px 16px), a blue background color (#007bff), and white text. - Removes the default border and changes the cursor to a pointer for interactivity.
- Creates a visually appealing button with padding (
- Hover Effect:
- When hovered, the button’s background changes to a darker shade of blue (
#0056b3) to indicate interactivity.
- When hovered, the button’s background changes to a darker shade of blue (
3. Input Field Styling:
.make-dynamic-table-input label:- Adds a small right margin (
margin-right: 10px) for spacing and increases the font size to 16px for better readability.
- Adds a small right margin (
.make-dynamic-table-input input:- Adds a right margin and padding to make inputs visually balanced.
- Sets the font size to 14px for consistency and readability.
JavaScript Code For Creating a Dynamic HTML Table Using JavaScript
function tableCreate() {
  var table = document.querySelector(".dynamic-table");
  table.innerHTML = "";

  var row = document.querySelector("input[name='table_row']").value;
  var col = document.querySelector("input[name='table_col']").value;

  var rows = parseInt(row);
  var cols = parseInt(col);

  if (isNaN(rows) || isNaN(cols) || rows <= 0 || cols <= 0) {
      alert("Please enter valid positive numbers for rows and columns.");
      return;
  }

  var headerRow = document.createElement("tr");
  for (var j = 0; j < cols; j++) {
      var headerCell = document.createElement("th");
      headerCell.contentEditable = "true";
      headerCell.textContent = `Header ${j + 1}`;
      headerRow.appendChild(headerCell);
  }
  table.appendChild(headerRow);

  for (var i = 0; i < rows; i++) {
      var row_create = document.createElement("tr");
      for (var j = 0; j < cols; j++) {
          var col_create = document.createElement("td");
          col_create.contentEditable = "true";
          row_create.appendChild(col_create);
      }
      table.appendChild(row_create);
  }
}
CODE EXPLANATION OF JAVASCRIPT
The tableCreate() This function generates a dynamic, editable table based on user input for the number of rows and columns.
- Clearing Existing Table: The function first clears any previous table content using
table.innerHTML = "". - Getting Input Values: It fetches the row and column numbers from the input fields.
- Validation: The function checks if the inputs are valid positive numbers. If not, it shows an alert and exits.
- Creating Header Row: A header row is created with editable cells labeled
Header 1,Header 2, etc. - Creating Data Rows: For each row, editable cells are created and added to the table.
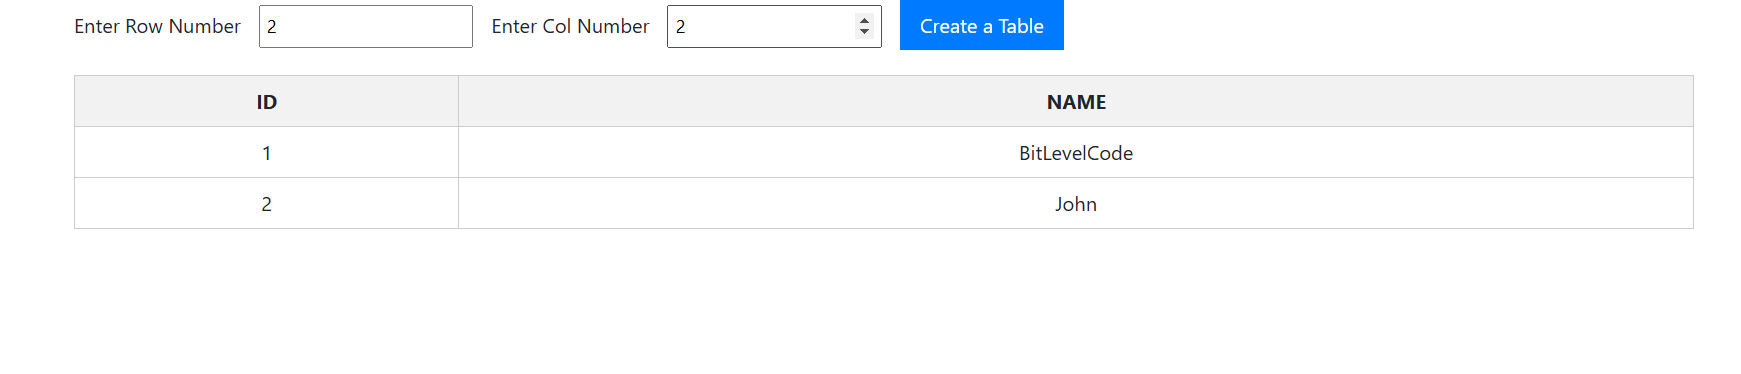
OUTPUT:
Tips for Optimizing Dynamic Tables
Here are a few best practices when working with JavaScript-generated tables:
- Use event delegation if adding many rows dynamically
- Add pagination for large datasets
- Use localStorage or a database to store data persistently
- Add CSS classes for better UI control
- Optimize for mobile using responsive design techniques
Related post:
>>How to create jQuery accordion with multiple divs
>>How to create a WordPress theme
Conclusion:
In conclusion, creating a dynamic HTML table using JavaScript allows you to build interactive and customizable tables with ease. By leveraging user input for the number of rows and columns, you can generate tables that meet specific needs in real-time.
Feel free to experiment with this method. If you have any questions, don’t hesitate to reach out. Happy coding!
