Everybody is drawn to Notion for different reasons. I think it’s the aesthetics of it all; Notion ticks all the visual boxes with its slick UI and adorable animations in its demo videos. The notion can be your word processor, database, board, and second brain, too.
But what if you want to add it to some of your apps as well? Yes, you can now do it using Notion API and we will show you how to integrate it using Python. This guide will help you work with Notion API in Python and use notion using notion API in Python.
To make it possible you have to set up Notion. Let’s start the guide with setting up the notion account.
Table of Contents
Setting Up the Notion
To set up Notion, you need to create a page that contains a database in Notion. In the below image, we create a page that contains 3 fields: Name, Description, and Completed.

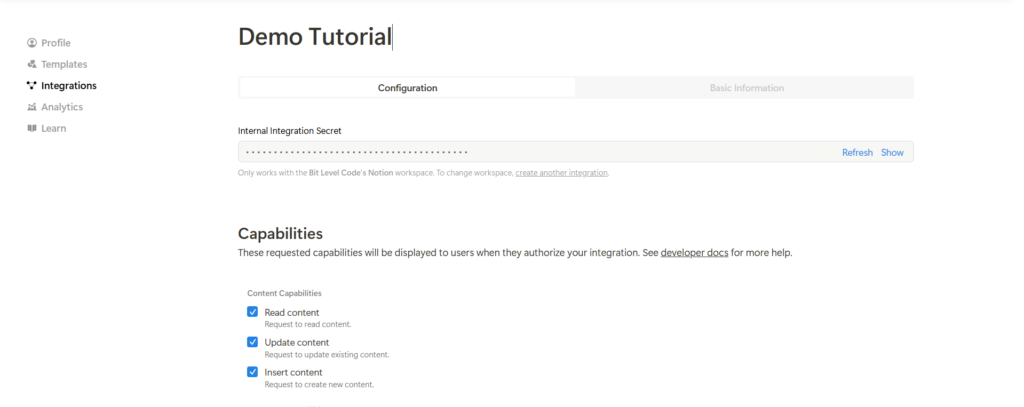
To access this page inside Python, we must first create an integration for it. To do this, go to Settings > Connections > Develop or Manage Your Integrations. After that, Specify a name for your integration and click to submit. At the end, You will get this below screen:

Check out the image, you will see a secret key. Copy that API key because we will use it in our API integration program.
Before starting with code, we need to do 2 more steps in Notion:
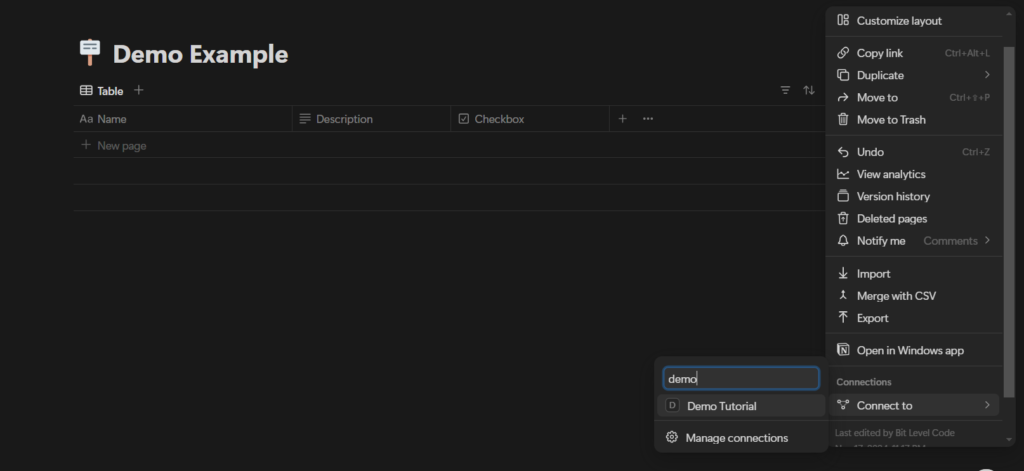
- Go to the Notion Page, Click the Three Dot button (Top Right Screen), press Connect To, and then select the integration that you just created from a list:

- After connecting with the integration in your browser, you will need a database id. You will find the following link in the browser: https://www.notion.so/1419fe5e2aeb80ed8a1dc7fe00c53245?v=d98846de4f0a40eb938c7e3f768eda9c. The database ID is 1419fe5e2aeb80ed8a1dc7fe00c53245
Python Setup for Work with Notion API in Python
To start with setup, we need to install a package to make HTTP requests.
pip install httpxThen, we import the httpx library that we are going to use to interact with the Notion API, then, we have to store the secret and database_id from the notion setup.
import httpx

token = 'secret_from_notion_integration'
database_id = 'database_id_from_link'Now, we will use the httpx library to interact with the Notion API.
def demoTodo():
  url = f'https://api.notion.com/v1/databases/{database_id}/query'

  r = httpx.post(url, headers={
    "Authorization": f"Bearer {token}",
    "Notion-Version": "2022-06-28"
  })

  result_dict = r.json()
  list_result = result_dict['results']

print(movie_list_result)Now, if you add a name in Notion, and you call this function, you will see a lot of data. To make it more readable and use only the information we need, we will make a helper function;
def mapNotionResult(result):
  # you can print result here and check the format of the answer.
  name_id = result['id']
  properties = result['properties']
  description = properties['Description']['rich_text'][0]['text']['content']
  name = properties['Name']['title'][0]['text']['content']
  completed = properties['Completed']['checkbox']

  return {
    'description': description,
    'name': name,
    'completed': completed,
    'movie_id': name_id
}and call it inside demoTodo. The function should contain the following code:
def demoTodo():
  url = f'https://api.notion.com/v1/databases/{database_id}/query'

  r = httpx.post(url, headers={
    "Authorization": f"Bearer {token}",
    "Notion-Version": "2022-06-28"
  })

  result_dict = r.json()
  list_result = result_dict['results']

  names = []

  for list in list_result:
      names.append(mapNotionResult(movie))

return moviesExample of usage:
demoTodo = demoTodo()
# json.dumps is used to pretty print a dictionary
print('list:', demoTodo)Now, you can use this function to display your list inside Python. Nice?
The next function we are going to implement is createTodo. For this one, we will need to construct a payload similar to the response from demoTodo.
def createTodo(name, description, completed=False):
  url = 'https://api.notion.com/v1/pages'

  payload = {
    "parent": {
      "database_id": database_id
    },
    "properties": {
      "Name": {
        "title": [
          {
            "text": {
              "content": name
            }
          }
        ]
      },
      "Genre": {
        "rich_text": [
          {
            "text": {
              "content": description
            }
          }
        ]
      },
      "Completed": {
        "checkbox": completed
      }
    }}

  r = httpx.post(url, headers={
    "Authorization": f"Bearer {token}",
    "Notion-Version": "2022-06-28",
    "Content-Type": "application/json"
  }, json=payload)

  list_name = mapNotionResult(r.json())
return list_nameYou can use it like this:
createdTodo = createTodo('name1', 'description1', False)
print('Created ToDo:', createdTodo)If you check your Notion, you will see that a new row in the table was created successfully.
Now we will go for the update function is pretty similar to the create one. We have to consider a name_id. We similarly create the payload but we also add the name_id in the URL.
def updateName(nameId, name):
  url = f'https://api.notion.com/v1/pages/{nameId}'

  payload = {
    "properties": {
      "Name": {
        "title": [
          {
            "text": {
              "content": name['name']
            }
          }
        ]
      },
      "Description": {
        "rich_text": [
          {
            "text": {
              "content": name['Description']
            }
          }
        ]
      },
      "Completed": {
        "checkbox": name['completed']
      }
    }}

  r = httpx.patch(url, headers={
    "Authorization": f"Bearer {token}",
    "Notion-Version": "2022-06-28",
    "Content-Type": "application/json"
  }, json=payload)

  result = mapNotionResult(r.json())
return resultTo use this function, you first need to call demoTodo(). In that response, you can get a nameId. In that response, you can get a nameID and use it like this:
updatedName = updateName('fdd0fa87-4729-43e6-ae3f-823d48b382ee', {
  'name': 'name1',
  'description': 'description1',
  'completed': True
})
print('Update name', updatedName)Now we create the last function deleteName. In Notion, pages are using a property called archived. If we set that to true, then the page will be deleted. So, this function will use the update endpoint in order to change the value of the archived boolean.
def deleteName(movieId):
  url = f'https://api.notion.com/v1/pages/{NameId}'

  payload = {
    "archived": True
  }

  r = httpx.patch(url, headers={
    "Authorization": f"Bearer {token}",
    "Notion-Version": "2022-06-28",
    "Content-Type": "application/json"
}, json=payload)Now, you can use it with a nameId, and if you check the database in Notion, that specific row will be deleted.
deleteName('a19e538d-10cc-40ec-91bb-f7237c93e428')It is easier to interact with Notion from JavaScript because it provides an SDK client, In Python, we don’t have one, but that shouldn’t stop you from using it.
Related Post:
>> 5 Free Hosting Platforms for Python Applications
>> Encoding and Decoding Using Base64 Strings in Python
>> What is Threading Mutex in Python – Simple Way
Conclusion: How to Work With Notion API in Python
Python integration with the Notion API has a lot of promise for data management and workflow automation. You may quickly interact with your Notion workspace by establishing an integration, building a database, and utilizing Python’s httpx package to retrieve, create, update, and delete entries programmatically.
Although there isn’t an official Notion SDK for Python, working with the Notion API in Python is made easy by httpx’s flexibility. You now have the resources to create unique integrations, automate processes, and increase your Notion productivity thanks to this guide “Work with Notion API in Python”
Start experimenting and use Python to enhance the functionality of your Notion workspace!


