
So, today we will walk through another functionality of WordPress that helps you showcase your recent posts, categories, advertisements, or anything you would like to add. That Magical thing called “Widget”. In this tutorial, we will learn how to create a custom WordPress widget.
Let’s go with me to swim again in the sea of WordPress.
Let me clear something up first: I am using the Twenty Twenty-One theme, which is a classic theme. So, whatever you learn in this tutorial will be helpful for the classic theme. Please do not use a block theme like Twenty Twenty-Four or Twenty Twenty-Five; it will not work because block themes do not use the traditional process.
If you want to show a widget for a block theme, you need to create a child theme and then code for the sidebar with the help of the “register_sidebar” function. Then add your things like recent posts, categories, etc. After that, go to Appearance > Editor > Template, choose the single blog post, then click on the “+” button to select a template part. Then you can give a name to it, and on the right-hand side from the Advanced option, import your sidebar. Only then will the sidebar show on your site.
You can create a custom widget using a child theme or any custom plugin. I will use a child theme in this tutorial.
Table of Contents
Steps to Create a Custom WordPress Widget
Step 1: First of all, you need to download WordPress to your system, and I am guessing you guys have XAMPP or WAMP installed on your system. If not, then:
WordPress Download Link: https://wordpress.org/download/
XAMPP Download Link: https://www.apachefriends.org/download.html
WAMP Download Link: https://sourceforge.net/projects/wampserver/
Or else, you can use Local.
Local Download Link: https://localwp.com/
I would suggest using Local for WordPress. Then you do not need to create a database separately or download WordPress manually. It will help you to make a site as long as you want—just click the “Create New Site” button, and your site is ready.
Step 2: After completing the download for WordPress or any local environment, go to the admin site, navigate to Appearance > Theme > Add Theme, and look for the Twenty-One theme. Then, install it.
Step 3: After installing the theme, create a folder named twentytwentyone-child in the directory: wp-content/themes/twentytwentyone-child.
So, your child theme is created.
Step 4: The main file for a child theme is the style.css file, which is a required file. Others are optional according to functionality. We must create files like page.php for a single blog page, sidebar.php for the sidebar, front-page.php for the home page, etc.
First, create a file named style.css.
Code for style.css
/*
Theme Name: Twenty Twenty-One Child
Template: twentytwentyone
Requires at least: 6.1
Requires PHP: 7.4
Version: 1.0
Description: My classic-style child theme
Tags: classic
*/Step 5: We need to create a file named functions.php.
In that, first enqueue style.css for styling purposes.
// Enqueue the parent theme stylesheet
add_action('wp_enqueue_scripts', function() {
    wp_enqueue_style('twentytwentyone-style', get_template_directory_uri() . '/style.css');
});Step 6: As we are going to create a custom widget, we need to create a sidebar first to assign the custom widget. We will use the register_sidebar function.
add_action( 'widgets_init', 'my_register_sidebars' );
function my_register_sidebars() {
	register_sidebar(
		array(
			'id'            => 'primary',
			'name'          => __( 'Primary Sidebar' ),
			'description'   => __( 'A short description of the sidebar.' ),
			'before_widget' => '<div id="%1$s" class="widget %2$s">',
			'after_widget'  => '</div>',
			'before_title'  => '<h3 class="widget-title">',
			'after_title'   => '</h3>',
		)
	);
}Step 7: After creating the sidebar, we will move to create a custom widget. Okay, so my widget is related to showing the recent post category, and for each individual post, it will show dynamically.
class wpb_widget extends WP_Widget {
    function __construct() {
        parent::__construct(
            'category_tag_Widget',
            __( 'Category and Tag Shows', 'textdomain' ),
            [
                'description' => __( 'Show post"s category and Tag', 'textdomain' ),
            ]
        );
    }

    // Creating widget front-end
    public function widget( $args, $instance ) {
        if (is_single()) {
            global $post;
      $date_show = ! empty($instance['date_show']) ? 1 : 0;
            // Get categories
            $categories = get_the_category($post->ID);
            $category_list = '';
            if ($categories) {
                $category_title = isset($instance['category_title']) ? $instance['category_title'] : 'Categories';
                $category_list = '<strong>' . esc_html($category_title) . ':</strong> ';
                foreach ($categories as $category) {
                    $category_list .= '<a href="' . esc_url(get_category_link($category->term_id)) . '">' . esc_html($category->name) . '</a>, ';
                }
                $category_list = rtrim($category_list, ', ');
            }

            // Get tags
            $tags = get_the_tags($post->ID);
            $tag_list = '';
            if ($tags) {
                $tag_title = isset($instance['tag_title']) ? $instance['tag_title'] : 'Tags';
                $tag_list = '<br><strong>' . esc_html($tag_title) . ':</strong> ';
                foreach ($tags as $tag) {
                    $tag_list .= '<a href="' . esc_url(get_tag_link($tag->term_id)) . '">' . esc_html($tag->name) . '</a>, ';
                }
                $tag_list = rtrim($tag_list, ', ');
            }
  if ($date_show) {
                    echo '<li class="wpb-post-date">';
                    echo 'Date: ' . esc_html(get_the_date('F j, Y', $post_id));
                    echo '</li>';
                }
            // Get widget title from instance
            $title = apply_filters('widget_title', $instance['title']);

            // Output the widget content
            echo $args['before_widget'];
            if (!empty($title)) {
                echo $args['before_title'] . $title . $args['after_title'];
            }
            echo '<div class="post-categories-tags-widget">';
            echo $category_list . $tag_list;
            echo '</div>';
            echo $args['after_widget'];
        }
    }

    // Widget Settings Form (Admin form)
    public function form( $instance ) {
        // Get values from the instance, set defaults if empty
        $title = isset($instance['title']) ? $instance['title'] : __( 'New title', 'textdomain' );
        $category_title = isset($instance['category_title']) ? $instance['category_title'] : 'Categories';
        $tag_title = isset($instance['tag_title']) ? $instance['tag_title'] : 'Tags';
        $date_show = ! empty($instance['date_show']) ? 1 : 0;

        // Admin form fields
        ?>
        <p>
            <label for="<?php echo $this->get_field_id( 'title' ); ?>">
                <?php _e( 'Widget Title:', 'textdomain' ); ?>
            </label>
            <input
                class="widefat" id="<?php echo $this->get_field_id( 'title' ); ?>"
                name="<?php echo $this->get_field_name( 'title' ); ?>"
                type="text" value="<?php echo esc_attr( $title ); ?>"
            />
        </p>

        <p>
            <label for="<?php echo $this->get_field_id( 'category_title' ); ?>">
                <?php _e( 'Category Title:', 'textdomain' ); ?>
            </label>
            <input
                class="widefat" id="<?php echo $this->get_field_id( 'category_title' ); ?>"
                name="<?php echo $this->get_field_name( 'category_title' ); ?>"
                type="text" value="<?php echo esc_attr( $category_title ); ?>"
            />
        </p>

        <p>
            <label for="<?php echo $this->get_field_id( 'tag_title' ); ?>">
                <?php _e( 'Tag Title:', 'textdomain' ); ?>
            </label>
            <input
                class="widefat" id="<?php echo $this->get_field_id( 'tag_title' ); ?>"
                name="<?php echo $this->get_field_name( 'tag_title' ); ?>"
                type="text" value="<?php echo esc_attr( $tag_title ); ?>"
            />
        </p>
          <p>
            <input
                type="checkbox"
                id="<?php echo $this->get_field_id('date_show'); ?>"
                name="<?php echo $this->get_field_name('date_show'); ?>"
                <?php checked($date_show, 1); ?> />
            <label for="<?php echo $this->get_field_id('date_show'); ?>">
                <?php _e('Show post date', 'textdomain'); ?>
            </label>
        </p>
        <?php
    }

    // Updating widget settings (save the data)
    public function update( $new_instance, $old_instance ) {
        $instance = array();
        $instance['title'] = (!empty($new_instance['title'])) ? strip_tags($new_instance['title']) : '';
        $instance['category_title'] = (!empty($new_instance['category_title'])) ? strip_tags($new_instance['category_title']) : 'Categories';
        $instance['tag_title'] = (!empty($new_instance['tag_title'])) ? strip_tags($new_instance['tag_title']) : 'Tags';
  $instance['date_show'] = ! empty($new_instance['date_show']) ? 1 : 0;
        return $instance;
    }
}

function register_post_categories_tags_widget() {
    register_widget('wpb_widget');
}
add_action('widgets_init', 'register_post_categories_tags_widget');Explanation Of Widget’s Code
1. Extend the WordPress Widget Class
To follow WordPress’s traditional method, start by extending the built-in widget class. This gives you the base structure needed to create your custom widget.
2. Define Widget ID, Name, and Description
Inside the constructor, set:
- A unique ID for the widget (helps WordPress identify it).
- A name (visible in the widget list).
- A short description (shown on the sidebar to explain what the widget does).

3. Display Output on the Frontend
Create a function that handles what the widget shows on your website. In this case:
- Use a condition to check if it’s a single blog post.
- If it is, fetch and display the post’s categories and tags.
- Add a widget title and wrap the output with proper HTML structure so it fits nicely in your sidebar.
4. Create an Admin Form
Provide a simple form in the WordPress dashboard that lets users:
- Enter a custom widget title.
- Customize the headings for categories and tags.
This makes the widget flexible for anyone adding it from the admin area.
5. Save Updated Settings
Add logic to save any changes the user makes in the widget settings. Make sure the values are cleaned properly before saving.
6. Register the Widget
Finally, hook your widget into WordPress so it becomes available in the Widgets section of the admin panel. Without this, it won’t appear for use.
Output
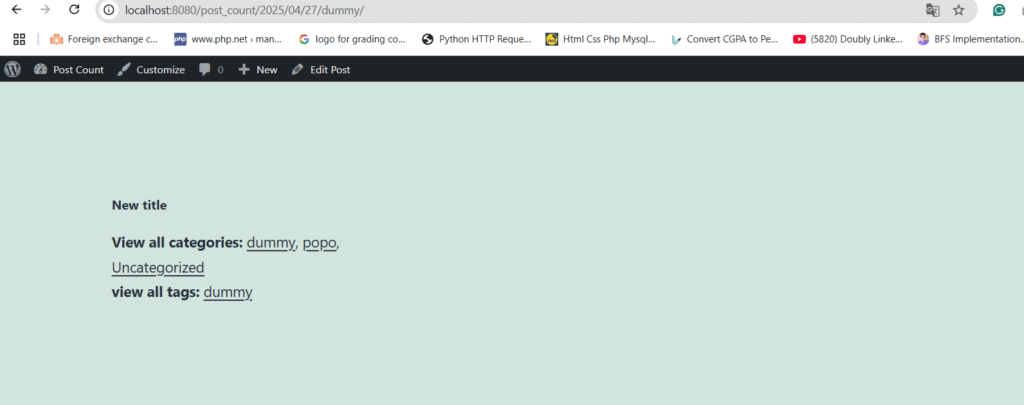
Recent Posts
>>How to Create Dynamic Charts in PHP Using ChartJS?
>> How to Use AJAX in WordPress? – step-by-step guide
Conclusion: Create a Custom WordPress Widget
Creating your own widget in WordPress might seem tricky at first, but by following a few simple steps, you can build something useful and dynamic for your site. In this guide, we learned how to create a custom WordPress widget that displays categories and tags for individual blog posts. This not only improves user experience but also helps with SEO by linking to related content.
If you’re looking to make your website more interactive and organized, learning how to create a custom WordPress widget is a great skill to have. It gives you full control over what you show in your sidebars and enhances your site’s functionality without relying on third-party plugins.