
If you want to improve user experience and performance on your WordPress blog, creating a custom widget to filter posts by category using AJAX is a smart solution. Unlike traditional methods that reload the entire page, this approach loads only the filtered posts instantly, making your site faster and more dynamic. In this tutorial, you’ll learn how to build this feature step by step — perfect for developers who want to add interactive filtering without relying on heavy plugins.
This tutorial is based on the traditional WordPress widget creation process. I’ve used the Twenty Twenty-One theme and the Classic Theme Editor to build a custom widget that lets you filter posts by category using AJAX. You can follow this guide with any classic theme, and no page reloads are needed when filtering — everything works smoothly with dynamic AJAX requests.
This tutorial is for you if you’re a developer looking to improve UX and post filtering on your site. If you need help with any part of the code, feel free to leave a comment or reach out through the Contact Form on my site. I’m happy to help.
Table of Contents
Getting Started: Set Up WordPress Locally Before Writing Code
Before we dive into creating a custom widget to filter posts by category using AJAX, you need a WordPress development environment set up on your local machine. Don’t worry — it’s quick and beginner-friendly.
Step 1: Download WordPress
Start by downloading the latest version of WordPress from the official site.
Step 2: Choose Your Local Server (XAMPP, WAMP, or Flywheel Local)
To run WordPress locally, you need a server environment. You can choose from:
- XAMPP — cross-platform, open-source
- WAMP — for Windows users
- Local by Flywheel — easiest option, no manual database setup
Tip: If you want to skip the manual setup, use Local by Flywheel. Just install it, click “Create New Site,” and you’re done — no extra downloads or database setup needed.
Step 3: Install a Theme (Twenty Twenty-One)
Once your local WordPress site is up and running:
- Go to Appearance > Themes > Add New
- Search for Twenty-Twenty-One
- Click Install and then Activate
This tutorial is based on the Twenty Twenty-One theme, but you can follow it with any classic theme.
Step 4: Install the Classic Editor Plugin
To make things easier for theme and widget development, we’ll use the Classic Editor plugin.
- Go to Plugins > Add New
- Search for Classic Editor
- Click Install and then Activate
Step 5: (Optional) Create a Child Theme
We recommend using a child theme if you plan to modify the theme files directly. It keeps your changes safe during theme updates. We’ll talk about creating a child theme later in the tutorial — for now, just install the main theme.
Steps to Create a WordPress Widget to Filter Posts by Category Using AJAX
1. Create a Child Theme
Start by creating a child theme of the Twenty Twenty-One theme.
- Name the folder
twentytwentyone-child. - Inside it, create a
style.cssfile and add the required theme header.
Style.css:
/*
Theme Name: Twenty Twenty-One Child
Theme URI: https://wordpress.org/themes/twentytwentyone/
Description: Twenty Twenty-One is a blank canvas for your ideas and it makes the block editor your best brush. With new block patterns, which allow you to create a beautiful layout in a matter of seconds, this theme’s soft colors and eye-catching — yet timeless — design will let your work shine. Take it for a spin! See how Twenty Twenty-One elevates your portfolio, business website, or personal blog.
Requires at least: 5.3
Tested up to: 6.8
Requires PHP: 5.6
Version: 2.5
License: GNU General Public License v2 or later
License URI: http://www.gnu.org/licenses/gpl-2.0.html
Text Domain: twentytwentyonechild
Template: twentytwentyone
Tags: one-column, accessibility-ready, custom-colors, custom-menu, custom-logo, editor-style, featured-images, footer-widgets, block-patterns, rtl-language-support, sticky-post, threaded-comments, translation-ready, blog, portfolio

Twenty Twenty-One WordPress Theme, (C) 2020 WordPress.org
Twenty Twenty-One is distributed under the terms of the GNU GPL.
*/- Once done, go to Appearance > Themes in your WordPress dashboard and activate your child theme.

2. Create a functions.php File
Next, create a functions.php file in your child theme.
You will use this file to:
- Register the widget
- Link styles and scripts
- Handle AJAX functionality
3. Enqueue Your Styles and Scripts
Inside your child theme, create an assets folder with two files:
assets/custom.css– for styling the widget and filter UI.assets/custom.js– for handling AJAX requests.
Use wp_enqueue_style and wp_enqueue_script in functions.php to link these files properly.
Also, use wp_localize_script to pass AJAX URLs and variables from PHP to JavaScript.
functions.php:
<?php

/**
 * Enqueue CSS *
 */

add_action('wp_enqueue_scripts', 'mychildtheme_enqueue_styles');
function mychildtheme_enqueue_styles()
{
    wp_enqueue_style('parent-style', get_template_directory_uri() . '/style.css');
    wp_enqueue_style('custom', get_stylesheet_directory_uri() . '/assets/custom.css');

    wp_enqueue_script('jquery');

    wp_enqueue_script(
        'custom-js',
        get_stylesheet_directory_uri() . '/assets/custom.js',
        array('jquery'), // make sure jQuery loads first
        time(),
        true
    );

    wp_localize_script('custom-js', 'custom_call', array(
        'ajaxurl' => admin_url('admin-ajax.php'),
        'homeurl' => home_url()
    ));
}
4. Register the Sidebar
Use the register_sidebar() function to create a custom sidebar where your filter widget will be displayed. This step allows you to control where the widget appears, such as on the blog page.
functions.php:
/**
 * Add a sidebar.
 * */
function theme_slug_widgets_init()
{
    register_sidebar(array(
        'name'          => __('Main Sidebar', 'admin-setup-plugin'),
        'id'            => 'main-sidebar',
        'description'   => __('Widgets in this area will be shown on all Blog Pages', 'admin-setup-plugin'),
        'before_widget' => '<li id="%1$s" class="widget %2$s">',
        'after_widget'  => '</li>',
        'before_title'  => '<h2 class="widgettitle">',
        'after_title'   => '</h2>',
    ));
}
add_action('widgets_init', 'theme_slug_widgets_init');
5. Create sidebar.php File
Now, create a sidebar.php file in your theme folder.
This file will contain the dynamic_sidebar() function to display widgets added to the registered sidebar.
<?php // sidebar.php

// Check if the sidebar is active
if ( is_active_sidebar( 'main-sidebar' ) ) : ?>

    <aside class="sidebar">
        <?php dynamic_sidebar( 'main-sidebar' ); ?>
    </aside>

<?php endif; ?>
6. Edit the Blog Page Template (home.php)
To show the sidebar on the blog page:
- Create or edit the
home.phpfile. - Include
get_sidebar()to load yoursidebar.phpand display the widget alongside blog posts.
home.php:
<?php get_header(); ?>

<main id="primary" class="site-main custom-blog-layout">
    <div class="blog-wrapper">
        <!-- Main Content -->
        <div class="blog-content">
            <?php
            if ( have_posts() ) :
                while ( have_posts() ) : the_post(); ?>
                    <article <?php post_class(); ?>>
                        <h2><a href="<?php the_permalink(); ?>"><?php the_title(); ?></a></h2>
                        <?php the_excerpt(); ?>
                    </article>
                <?php endwhile;
                the_posts_pagination();
            else :
                echo '<p>No posts found.</p>';
            endif;
            ?>
        </div>
        <div class="filter_content"></div>
        <!-- Sidebar -->
        <aside class="blog-sidebar">
            <?php if ( is_active_sidebar( 'main-sidebar' ) ) {
                dynamic_sidebar( 'main-sidebar' );
            } ?>
        </aside>
    </div>
</main>

<?php get_footer(); ?>
7. Design Your Filter UI (Optional)
Use the custom.css file to design the dropdown or checkbox filter for categories.
You can fully customize the look and feel to match your theme or keep it simple.
custom.css:
.custom-blog-layout {
    padding: 0;
    margin: 0;
}

.blog-wrapper {
    display: flex;
    gap: 2rem;
    max-width: 1200px;
    margin: 0 auto;
    padding: 2rem;
}

.blog-content {
    flex: 2;
}

.blog-sidebar {
    flex: 1;
}

.blog-sidebar .widget {
    background: #fff;
    padding: 1rem;
    margin-bottom: 1.5rem;
    border: 1px solid #ddd;
    border-radius: 5px;
}
8. Build the Custom Widget
In your functions.php file, create a custom widget class using the traditional WP_Widget method.
This widget will:
- Display the category filter (dropdown or checkbox)
- Handle AJAX requests
- Show filtered posts dynamically
functions.php:
class wpb_widget extends WP_Widget
{
    function __construct()
    {
        parent::__construct(

            'category_filter',

            __('Category Filter', 'textdomain'),

            [
                'description' => __('Sample widget based on WPBeginner Tutorial', 'textdomain'),
            ]
        );
    }

    // Creating widget front-end
    public function widget($args, $instance)
    {
        $title = apply_filters('widget_title', $instance['title'] ?? '');

        echo $args['before_widget'];

        if (! empty($title)) {
            echo $args['before_title'] . esc_html($title) . $args['after_title'];
        }

        $arr = array(
        'taxonomy' => 'category',
        'hide_empty' => false,   //to get all type of category even that has not any post
        );
        $categories = get_categories($arr);

        foreach ($categories as $category) {
            $cat_id = esc_attr($category->term_id);
            $cat_name = esc_html($category->name);
            echo "<div>
            <input type='checkbox' id='$cat_id' name='category_filter[]' class='category_filter_custom' />
            <label for='$cat_id'>$cat_name</label>
        </div>";
        }

        echo $args['after_widget'];
    }
    // Widget Settings Form
    public function form($instance)
    {

        if (isset($instance['title'])) {
            $title = $instance['title'];
        } else {
            $title = __('Category', 'textdomain');
        }

        // Widget admin form
?>
<p>
    <label for="<?php echo $this->get_field_id('title'); ?>">
        <?php _e('Title:', 'textdomain'); ?>
    </label>
    <input class="widefat" id="<?php echo $this->get_field_id('title'); ?>"
        name="<?php echo $this->get_field_name('title'); ?>" type="text" value="<?php echo esc_attr($title); ?>" />
</p>
<?php
    }

    // Updating widget replacing old instances with new
    public function update($new_instance, $old_instance)
    {
        $instance          = array();
        $instance['title'] = (! empty($new_instance['title'])) ? strip_tags($new_instance['title']) : '';
        return $instance;
    }
}

// Register and load the widget
function wpb_load_widget()
{
    register_widget('wpb_widget');
}

add_action('widgets_init', 'wpb_load_widget');
9. Set Up AJAX Functionality
Use WordPress’s built-in AJAX system to:
- Fetch posts based on the selected category
- Return the filtered HTML
- Update the post list on the front end without reloading the page
Make sure your AJAX function is accessible to both logged-in and non-logged-in users.
functions.php:
add_action('wp_ajax_filter_post', 'filter_post');
add_action('wp_ajax_nopriv_filter_post', 'filter_post');

function filter_post()
{
    $cate_id = isset($_POST['id']) ? array_map('intval', $_POST['id']) : [];

    $args = array(
        'posts_per_page' => -1,
        'offset' => 0,
        'category__in' => $cate_id,
    );

    $post_list = get_posts($args);

    ob_start();

    if (!empty($post_list)) {
        foreach ($post_list as $post_m) {
            global $post;
            $post = $post_m;
            setup_postdata($post); ?>

<article <?php post_class(); ?>>
    <h2><a href="<?php echo esc_url(get_permalink($post->ID)) ?>"><?php echo esc_html($post->post_title); ?></a></h2>
    <?php echo esc_html($post->post_excerpt); ?>
</article>

<?php }
        wp_reset_postdata();
    }

    $content = ob_get_clean();

    wp_send_json_success([
        'html' => $content,
    ]);
    wp_die();
}custom.js:
jQuery(document).ready(function($){

    jQuery('.category_filter_custom').on('change',function(){

        var cat_id = [];
        jQuery('.category_filter_custom:checked').each(function(){
         var id = jQuery(this).attr('id');
         cat_id.push(id);
        });
        // alert(cat_id);
         $.ajax({
        url: custom_call.ajaxurl,
        type: "POST",
        data: {
           id : cat_id,
           action : 'filter_post'
        },
        success: function (response) {
           jQuery('.blog-content').html(response.data.html);
        },
        complete: function () {
            console.log("great");
        },
    });
    });

});
Output:
Showing all posts
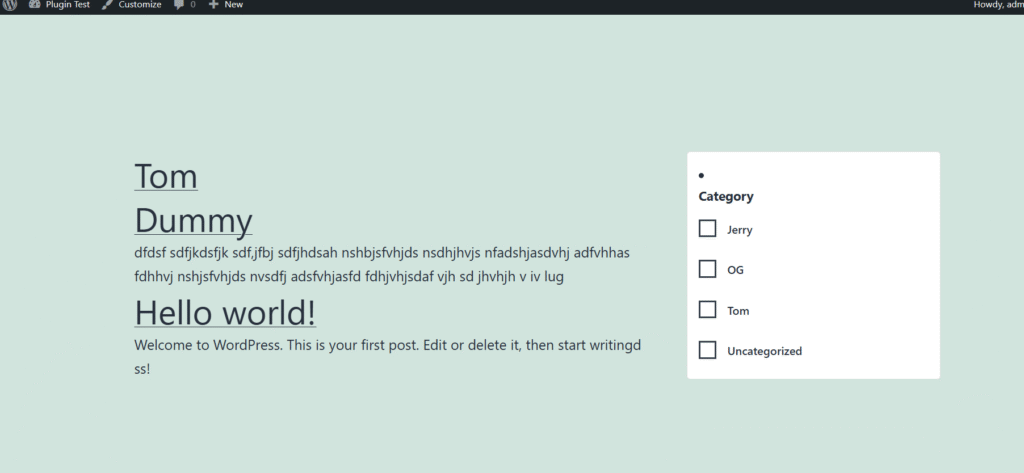
Showing posts according to category:
Image:

Recent Posts
>>How to Create Custom Gutenberg Block in WordPress?
>>How to create a custom WordPress widget
Conclusion
Creating a custom WordPress widget to filter posts by category using AJAX is a powerful way to enhance both user experience and performance on your site. With no page reloads and a smooth filtering process, this solution helps keep visitors engaged while giving developers more control over content display.
Whether you’re building it for your blog or a client project, this approach follows clean coding practices and works well with any classic theme. Keep experimenting, customize the UI, and adapt it to your needs, and if you run into issues, feel free to reach out!