
Creating a custom Gutenberg block in WordPress allows developers to extend the block editor with personalized features and content elements. Unlike the default blocks, custom blocks give you full control over design, structure, and functionality. Whether you’re building a unique layout for a client or adding specific functionality to your site, custom Gutenberg blocks offer a powerful way to enhance the WordPress editing experience. In this post, you’ll learn how to create your block step by step and make it seamlessly integrate into the editor.
In this tutorial, we will create a simple custom block that is beginner-friendly. I’ll also set up a custom post type for the block. Please note, I’m using the Twenty Twenty-Five theme. First, I’ll create a custom plugin, and inside it, I’ll add the code to register a custom post type. You can also register a custom post type using a child theme functions.php file or a custom plugin. I’ve chosen the plugin method for better flexibility.
If you prefer, you can skip the custom post type step and jump straight to creating the custom Gutenberg block. For this tutorial, I’ll create a custom post type called Book, and for the block, I’ll add an Author Name field. In future tutorials, I’ll show you how to add more fields. This guide is designed for beginners who are unsure where to start with Gutenberg block development in WordPress.
Table of Contents
How to Create a Custom Post Type in Block Theme
Creating a custom post type in a block theme is easy, but there’s one important thing to remember: you must set "show_in_rest" => true. This enables support for the block editor (Gutenberg). Other than that, the process is mostly the same as when creating a custom post type in a classic theme.
  function as_register_post_type()
    {
        register_post_type('book',
            array(
    'labels' => array(
      'name' => __('books', 'textdomain'),
      'singular_name' => __('book', 'textdomain'),
    ),
    'show_in_rest' => true, // to show in the block theme
    'public' => true,
    'publicly_queryable' => true,
    'has_archive' => true,
    'supports'    => array( 'title', 'editor', 'author', 'thumbnail', 'excerpt', 'comments' ),
  ));
    }
add_action('init','as_register_post_type');Steps For Creating a Custom Gutenberg Block in WordPress

Step 1: Install Node Version Manager (NVM)
First, download the nvm-setup.exe file from this link:
https://github.com/coreybutler/nvm-windows/releases
Run the installer and set up NVM on your system. I recommend using Node version 20.
Step 2: Install and Use Node.js Version 20
Open Command Prompt as Administrator and run the following commands:
nvm install 20
nvm use 20
node -vThis will install Node.js version 20 and make sure it’s active on your system.
Step 3: Navigate to Your WordPress Plugins Folder
Go to your WordPress plugins directory. For example:
cd xampp\htdocs\plugin_test\wp-content\plugins\Step 4: Create a New Block Plugin
Use the WordPress block creation tool by running:
npx @wordpress/create-block@latest authorThis will create a new folder named author with all the block files inside.
Step 5: Start Development Server
Navigate to the new block folder:
cd author
npm startThis command will build your block and watch for changes.
Step 6: Understand the Block Files
Inside the src folder, you will find important files like:
edit.js: Controls how the block appears in the editor.save.js: Defines how the block is saved and rendered on the front end.block.json: Contains block metadata and settings.
You can write your block logic in edit.js and save.js using the edit() and save() functions. Alternatively, you can use index.js to handle both, but separating them helps keep the code clear.
Step 7: Static vs Dynamic Blocks
The example here uses a static block, which saves content directly in the post. If you want a dynamic block, you can add a PHP render_callback in your plugin, but that is for advanced tutorials.
I will use raw HTML for this block. Although Gutenberg provides its own components like RichText and TextControl, I chose to use raw HTML because everyone is familiar with it, making it more helpful and easier to understand for beginners. Since we are creating an author field, a simple text input will do the job.
Explanation of Code
edi.js file
import { __ } from '@wordpress/i18n';
import { InspectorControls, useBlockProps } from '@wordpress/block-editor';
import { PanelBody } from '@wordpress/components';
import './editor.scss';

const AuthorDisplay = (author, setAttributes) =>
(
	<div
	className = 'container'>
		<div className = 'author_box'>
			<label for='author_field'>Author Name:</label>
			<input type = 'text' required id='author_field' className='author_class' value = {author} onChange={(event) => setAttributes({ author: event.target.value })}/>
		</div>
	</div>

);

export default function Edit({attributes, setAttributes}) {
	const {author} = attributes;

	return (
		<>
		<InspectorControls>
			 <PanelBody title={ __( 'Author Settings', 'author-settings' ) }>
			<p>{ AuthorDisplay(author,setAttributes)}</p>
                </PanelBody>
		</InspectorControls>
		<p { ...useBlockProps() }>
			{ __(
				'Author is:',
				'author-settings'
			) } {author}
		</p>
		</>
	);
}Explanation:
1. InspectorControls — The Sidebar Settings Panel
In the block editor, you might notice a sidebar on the right side when you select a block. That sidebar can hold extra settings for your block, like changing colors or adding custom fields.
InspectorControlsis the container that lets you put controls (settings) into that sidebar.- Inside
InspectorControls, there’s aPanelBodywhich acts like a collapsible box or section. Here, it’s titled “Author Settings”. - We place our author name input field inside this panel.
Why use InspectorControls?
You don’t have to. If you skip this, your input field will appear directly inside the block content area (the main editor), but putting it in the sidebar makes the block cleaner and easier to use.
With Inspectorcontrols and PanelBody:

Without Inspectcontrols and panel body:
2. AuthorDisplay Component — The Input Field
This part creates a text box where you can type the author’s name:
value={author}means the input shows whatever is stored in the block’sauthorattribute.onChangelistens for any typing or changes in that input. When you type something, this function runs and updates the block’s attributes with the new text.
3. Attributes and setAttributes
- Attributes are like variables that store the data of your block — in this case, the author’s name.
- setAttributes is the function you use to update those variables when something changes.
For example, when you type a new name, setAttributes({ author: event.target.value }) updates the block’s stored author name with whatever you typed.
4. useBlockProps()
This is a helper function from Gutenberg that adds all the necessary props (properties) to your block’s root element, like the block’s CSS classes and event handlers.
It means you’re telling WordPress: “This paragraph is the block’s main content wrapper. Please add all required block-related attributes here.”
Why is this important?
If you don’t use useBlockProps() both in your edit.js and save.js, the block editor might show warnings, or the block might not behave properly.
5. React and Gutenberg
Gutenberg blocks are built using React, a popular JavaScript library. You don’t need to be an expert in React to create simple blocks, but understanding a few React concepts like state (attributes) and event handling (onChange) will help a lot.
For example:
onChangeworks like JavaScript’s usual event listeners — when you type in the input box, it triggers a function.event.target.valuegets the current value of the input box.
Update the block.json File
"attributes": {
  "author": {
    "type": "string",
    "default": "loading"
  }
}What this does:
"author": This is the name of the attribute you’re storing."type": "string": It means this attribute will store text."default": "loading": If the user doesn’t type anything in the author field, it will show the word “loading” by default.
You can set this default to anything like "Author not available", an empty string "", or anything else you prefer.
Next Step: Go to save.js
Now that you’ve defined the attribute in block.json, You can display it on the front-end by editing the save.js file.
import { useBlockProps } from '@wordpress/block-editor';
export default function save({attributes}) {
	const {author} = attributes;
	return (
		<p { ...useBlockProps.save() }>
			<p>Author is { author }</p>
		</p>
	);
}useBlockProps.save()Adds necessary classes and props for your block to work correctly on the front end.attributesholds the data from your block — here, we get theauthorname- The block returns a
<div>with a<p>Inside showing the text: “Author is: [author name]”. - We use
<div>instead of<p>to avoid invalid HTML nesting.
Editor.scss:
#author_field
{
	width: 100%;
}You can design according to yourself.
Important Notes:
Whenever you make any changes to your block files (like edit.js, save.js, or editor.scss), you must run the following command in your plugin folder using CMD:
npm run startThis command compiles your code and applies the changes. If you don’t run it, your updates won’t show up in the WordPress editor.
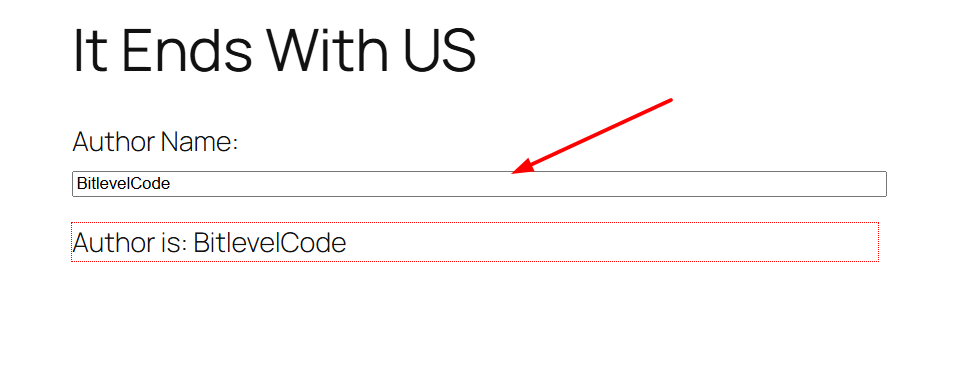
Output:

>>Recent Posts
>>How to Create a Custom WordPress Widget?- Step by Step Guide
Conclusion:
You’ve now created a basic custom Gutenberg block in WordPress with a custom post type and an author name input field. We used raw HTML for simplicity, added styling with editor.scss, and learned how to manage block data using setAttributes and attributes. We also discussed the importance of running npm run start to apply changes.
This example is great for beginners who want to get started with block development. In upcoming tutorials, we’ll explore how to add more fields and build dynamic blocks to extend functionality further.
Keep learning — the more you explore Gutenberg, the more powerful your WordPress projects will become!