


Managing checkbox values is a common task in web development, and jQuery makes it incredibly simple. If you’re looking for an easy way to get checkbox value in jQuery, this guide will walk you through the process. Whether you’re dealing with a single checkbox or multiple, you’ll learn how to retrieve their values efficiently.
Table of Contents
Add Jquery to get checkbox value in jQuery
To use jQuery for this functionality, you’ll first need to include the jQuery library in your project. Here’s how you can do it:
- Use the jQuery CDN
The easiest way to include jQuery is by adding the following CDN link directly in the<head>section of your HTML file.
<script src="https://cdnjs.cloudflare.com/ajax/libs/jquery/3.7.1/jquery.min.js"></script>- Download and Host jQuery Locally
If you prefer to host the library locally:- Open the CDN link in your browser.
- Copy all the code displayed on the page.
- Create a file named
jquery.min.jsin your project directory. - Paste the copied code into the
jquery.min.jsfile. - Include the file in your HTML like this:htmlCopy code
<script src="./jquery.min.js"></script>
- Direct Inclusion
For simplicity, you can directly use the CDN link in the<head>tag of your HTML. This method is faster and requires no additional downloads.
By adding jQuery, you’ll be able to efficiently handle events, manipulate the DOM, and create dynamic web functionality with ease.
HTML Code to get checkbox value in jQuery
<!DOCTYPE html>
<html lang="en">
<head>
    <meta charset="UTF-8">
    <meta name="viewport" content="width=device-width, initial-scale=1.0">
    <title>Get Value OF Checkbox in Jquery</title>
    <link rel="stylesheet" href="./get_value.css">
    <script src="https://cdnjs.cloudflare.com/ajax/libs/jquery/3.7.1/jquery.min.js"></script>
    <script src="get_value.js"></script>
</head>
<body>
    <form class="checkbox-submit" id="checkbox-submit" method="post">
        <table border="0">
            <tr class="table-header-class">
                <td>Languages Known</td>
            </tr>
            <tr class="tablerow">
                <td>
                    <label><input type="checkbox" name="language-name" id="language-english" value="English">English</label><br />
                    <label><input type="checkbox" name="language-name" id="language-french" value="French"> French</label><br />
                    <label><input type="checkbox" name="language-name" id="language-german" value="German"> German</label><br />
                    <label><input type="checkbox" name="language-name" id="language-latin" value="Latin"> Latin</label><br />
                </td>
            </tr>
            <tr class="table-header-class">
                <td><input id="btn-Submit" type="button" value="Submit" /></td>
            </tr>
        </table>
    </form>
</body>
</html>Code Explanation:
<!DOCTYPE html>and<html>:- Declares the document as HTML5 and defines the structure of the webpage.
<head>Section:- Purpose: Includes metadata, links to styles, and scripts needed for the webpage to function properly.
- Why: The title helps identify the page, the CSS file (
get_value.css) customizes the design, and the jQuery CDN +get_value.jsadds dynamic functionality like capturing checkbox values.
<form>Tag:- Purpose: Create a form with
method="post"for sending data to the server securely. - Why: The
id="checkbox-submit"allows targeting this form in JavaScript for event handling.
- Purpose: Create a form with
- Table Layout:
- Purpose: Organize content into rows and columns for better readability.
- Why:
- The header row (
Languages Known) gives context to the form. - The second row contains checkboxes for user input, styled using
<label>for better usability.
- The header row (
- Checkboxes:
- Purpose: Enable users to select multiple options.
- Why:
- The
name="language-name"groups the checkboxes for form submission. - Unique
ids identify each checkbox, andvalueattributes store the selected language.
- The
- Submit Button:
- Purpose: Allows users to trigger actions (e.g., submit or process the form).
- Why: The
id="btn-Submit"is used in the JavaScript file (get_value.js) to define what happens when clicked.
- Dependencies:
- CSS (
get_value.css): Enhances the visual appeal of the form, making it user-friendly. - jQuery CDN: Adds interactive functionality, like reading selected checkbox values dynamically.
- Custom JavaScript (
get_value.js): Defines what happens when the submit button is clicked, like retrieving selected values or showing alerts.
- CSS (
CSS Code to get checkbox value in jQuery
/* General Reset */
body {
    margin: 0;
    padding: 0;
    font-family: Arial, sans-serif;
    background: #f5f5f5;
    color: #333;
}

/* Center Form */
form.checkbox-submit {
    width: 350px;
    margin: 50px auto;
    padding: 20px;
    background: #ffffff;
    box-shadow: 0px 4px 8px rgba(0, 0, 0, 0.1);
    border-radius: 8px;
}

/* Table Styling */
table {
    width: 100%;
    border-collapse: collapse;
}

.table-header-class {
    background-color: #6200ea;
    color: white;
    font-size: 18px;
    text-align: center;
    padding: 10px;
    border-radius: 8px 8px 0 0;
    font-weight: bold;
}

.tablerow td {
    padding: 12px;
    font-size: 16px;
    line-height: 1.6;
    color: #555;
}

input[type="checkbox"] {
    margin-right: 10px;
    cursor: pointer;
}

/* Button Styling */
input#btn-Submit {
    display: block;
    width: 100%;
    padding: 12px;
    background: #6200ea;
    color: white;
    font-size: 16px;
    font-weight: bold;
    border: none;
    border-radius: 6px;
    cursor: pointer;
    transition: background 0.3s ease, transform 0.2s ease;
}

input#btn-Submit:hover {
    background: #5300cc;
    transform: scale(1.02);
}

/* Responsive Design */
@media (max-width: 480px) {
    form.checkbox-submit {
        width: 90%;
    }

    .tablerow td {
        font-size: 14px;
    }

    input#btn-Submit {
        font-size: 14px;
    }
}Code Explanation
This CSS code provides a clean, modern design for a form with checkboxes:
- General Reset: It removes the default margin and padding, sets a readable font, and uses a light background with dark text for better contrast and readability.
- Form Styling: The form is centered on the page with padding and a subtle box shadow to give it a soft elevated look. Rounded corners add to its visual appeal.
- Table Layout: Ensures the table uses the full width of the form and collapses borders for a neat presentation. The header row has a bold purple background with white text for emphasis.
- Checkbox Styling: Adds spacing between checkboxes and labels, and changes the cursor to a pointer, signaling interactivity.
- Button Styling: The submit button has a prominent purple background, white text, and rounded corners. It also includes a hover effect that changes the background color and slightly enlarges the button for an interactive feel.
- Responsive Design: For small screens, the form becomes narrower, and the text and button sizes are reduced to ensure better readability and user experience on mobile devices.
jQuery Code to get checkbox value in jQuery
jQuery(document).ready(function ($) {

    $('#btn-Submit').on('click', function () {
        var language = new Array();
        $('input[name = "language-name"]:checked').each(function () {
            language.push(this.value);
        });
        alert("Selected Languages are:" + language);
    });
});Code Explanation
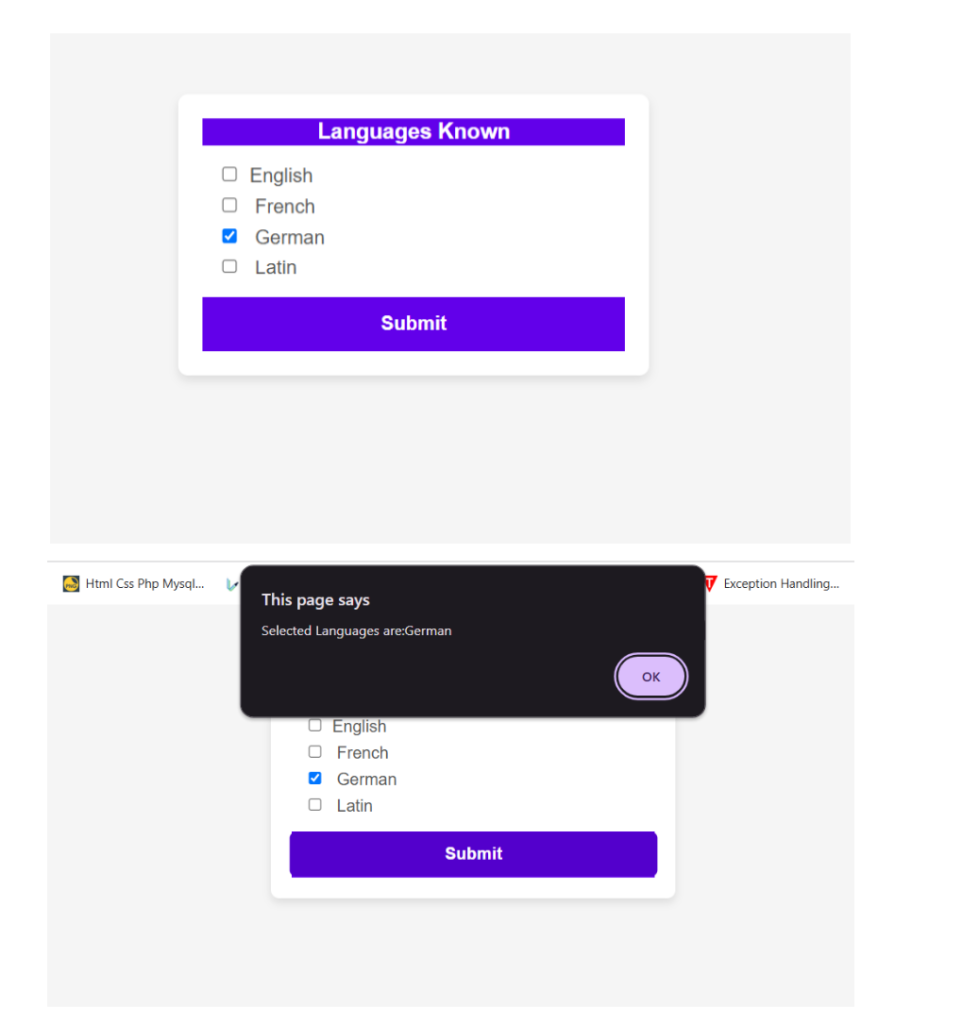
This jQuery script listens for a click event on the button with the ID btn-Submit. When clicked, it creates an empty array called language. It then loops through all checked checkboxes with the name language-name and adds their values to the language array. Finally, it displays an alert with the selected languages.
This approach helps capture multiple selected values from checkboxes and present them in a user-friendly way.
Output
Related Post
>> WooCommerce Visual Hook Guide Checkout Block : (Block-based Theme)
Conclusion: Get Checkbox Value in JQuery
In conclusion, using jQuery to capture selected checkbox values provides a simple and efficient way to gather user input. By listening for a button click, we can easily collect the checked options and display them through an alert, enhancing interactivity and user experience. This method is highly flexible and can be adapted for various forms and input types on your website.
Happy Coding!