Are you struggling to upload an image with drag-and-drop functionality? Here’s the perfect solution for you! With Dropzone.js, you can easily drag and drop image files for upload. This guide covers How to Use DropzoneJS in PHP for drag-and-drop file Uploads.
Often, you’ll see websites using Dropzone by adding a <form class="dropzone"></form> directly in their forms for quick setup. However, what if you need additional fields like a name, email, and image upload? Managing both can seem tricky, but don’t worry—we’ll guide you through a solution to ensure your form works smoothly with Dropzone, even with extra fields. By the end of this tutorial, you’ll know how to implement Dropzone.js for image uploads while handling other form fields without any issues.
How to Use DropzoneJS in PHP?
File Structure for how to use DropzoneJS in PHP? – Drag & Drop File
- You’ll need to add the Dropzone.js and Dropzone.css CDN links to the header of your HTML file. Here are the links:
<script src=”https://unpkg.com/dropzone@5/dist/min/dropzone.min.js”></script>
<link rel=”stylesheet” href=”https://unpkg.com/dropzone@5/dist/min/dropzone.min.css”/> - For styling purposes and to make the code responsive, you can use Bootstrap’s inbuilt classes. To do this, simply add the Bootstrap CDN links to your header. Here’s the code:
<link href=”https://cdn.jsdelivr.net/npm/bootstrap@5.3.3/dist/css/bootstrap.min.css” rel=”stylesheet”>
<script src=”https://cdn.jsdelivr.net/npm/bootstrap@5.3.3/dist/js/bootstrap.bundle.min.js”></script> - However, I recommend a more structured approach. Instead of relying on external CDNs, create a dedicated folder in your project for assets like CSS and JavaScript files. Here’s a simple structure you can follow:
- Create a folder called
assetsin your project directory. - Inside the
assetsfolder, create five subfolders:- admin-js (for JavaScript files)
- admin-css (for CSS files)
- custom-js(for custom JS files)
- custom-css(for custom CSS files)
- images(Upload images)
- You can create a file named bootstrap5.3.3.min.css in your admin-css folder. Go to the Bootstrap CDN link, copy the content, and paste it into this new file.
- For JavaScript, create a file named bootstrap.bundle5.3.3.min.js in the admin-js folder. Then, copy the content from the Bootstrap JS link and paste it into this file.
- Now, within the
admin-jsfolder, create a file nameddropzone5.9.3.min.js, and in theadmin-cssfolder, create a file nameddropzone.min.css. - To populate these files, go to the dropzone5.9.3.min.js link copy the content, and paste it into your newly created
dropzone5.9.3.min.js. Similarly, go to the dropzone.min.css link copy the content, and paste it into your newly createddropzone.min.css. - When making any changes related to jQuery in your project, the first step is to include the jQuery CDN link in your header section. Without adding this link, jQuery won’t function properly, and your custom scripts or features won’t work as expected. Always ensure the jQuery library is loaded before running any jQuery code. Here is the link:
<script src=”https://cdnjs.cloudflare.com/ajax/libs/jquery/3.7.1/jquery.min.js”></script>
Make sure to add the jQuery CDN link in your header, or you can create a file named jquery3.7.1.min.js in the admin-js folder. Then, go to the jQuery CDN link, copy the content, and paste it into the newly created jquery3.7.1.min.js file. This way, you’ll have a local copy of jQuery for better control over your project’s dependencies. - In the custom-css folder, create a file named dropzone.css for custom Dropzone styles.
- In the custom-js folder, create a file named dropzone.js for custom jQuery or JavaScript modifications.
Create a folder named images to store uploaded images and view them later.
- Create a folder called
- Create a file named dropzone.php to implement and configure your Dropzone setup.
- Create a file named show-img.php to perform image validation and upload files to the respective directory, such as ./assets/images.
Your folder & file structure should look like this after the preparation:

HTML CODE:
<!DOCTYPE html>
<html lang="en">
<head>
    <meta charset="UTF-8">
    <meta name="viewport" content="width=device-width, initial-scale=1.0">
    <link rel="stylesheet" href="./assests/admin-css/bootstrap5.3.3.min.css">
    <link rel="stylesheet" href="./assests/admin-css/dropzone.min.css">
    <script src="./assests/admin-js/dropzone5.9.3.min.js"></script>
    <script src="./assests/admin-js/bootstrap.bundle5.3.3.min.js"></script>
    <script src="./assests/admin-js/jquery3.7.1.min.js"></script>
    <link rel = "stylesheet" href="./assests/custom-css/dropzone.css">
    <title>How to Use DropzoneJS in PHP? - Drag & Drop File</title>
</head>
<body>
<form id="myForm" action="show-img.php" method="POST" enctype="multipart/form-data">
        <input type="text" size="50" name="fname" class="fname" id="fname" placeholder="Please, Enter your name"/>
        <span class="error error-name"></span>
        <span class="show-msg show-name"></span><br><br><br>
        <div class="dropzone" id="my-dropzone"></div>
        <span class="error error-img"></span>
        <span class="show-msg show-img"></span><br><br><br>
        <input type="submit" value="Submit"/>
    </form>
    <script src = "./assests/custom-js/dropzone.js"></script>
</body>
</html>Explanation OF Code:
- The header part of this code sets up an image upload feature using Dropzone.js, allowing drag-and-drop functionality. It includes Bootstrap for responsive design and jQuery for enhanced interactivity. Dropzone’s default styles are applied, with a custom CSS file for additional styling changes. This structure ensures a flexible, user-friendly image upload system while maintaining a clean and responsive layout.
- Meta tags ensure proper character encoding and responsive design.
- CSS files like Bootstrap and Dropzone provide styling, while a custom Dropzone CSS file allows for personalized adjustments.
- JavaScript files include Dropzone for drag-and-drop uploads, Bootstrap for interactive components, and jQuery for simplifying DOM manipulation and enhancing functionality.
- In the body part of this code, create a form with an input field for entering a name and a Dropzone area for uploading images. Just a reminder, when you’re uploading a file, make sure to use
enctype="multipart/form-data"in your form. Without it, your file won’t be uploaded properly.- This code creates a form that allows users to enter their name and upload an image using a drag-and-drop interface powered by Dropzone.js. The form includes a name input field with validation feedback and a custom Dropzone area for uploading images. It is used
enctype="multipart/form-data"to ensure the file is properly transmitted to the server. Error and success messages are displayed for both the name and image upload fields. The form is submitted to show-img.php for handling file validation and processing, while custom JavaScript enhancements for Dropzone functionality are applied via a script located in the custom-js folder. This setup provides a seamless and user-friendly experience for uploading images along with form data. - <script src = “./assests/custom-js/dropzone.js”></script>: This script is used to handle custom JavaScript functionality for Dropzone, located in the custom-js folder, enabling customizations for drag-and-drop file uploads.
- This code creates a form that allows users to enter their name and upload an image using a drag-and-drop interface powered by Dropzone.js. The form includes a name input field with validation feedback and a custom Dropzone area for uploading images. It is used
CSS CODE:
body {
    text-align: center;
    margin: 0;
    width: 100%;
    height: 100vh;
    background: linear-gradient(pink, white);
    display: flex;
    flex-direction: column;
    justify-content: center;
    align-items: center;
}
form {
    display: flex;
    flex-direction: column;
    align-items: center;
}

#my-dropzone {
    border: 2px dashed #007bff;
    border-radius: 10px;
    background: #f8f9fa;
    padding: 20px;
    width: 80%;
    max-width: 600px;
    margin-bottom: 20px;
    color: #007bff;
    font-size: 18px;
    text-align: center;
    cursor: pointer;
}

input[type="file"] {
    display: none;
}

input[type="submit"], input[type="text"] {
    border: 1px solid black;
    padding: 10px;
    background-color: black;
    color: aliceblue;
    margin: 5px;
}

input[type="text"] {
    width: 80%;
    max-width: 600px;
    margin-bottom: 20px;
}

input[type="submit"] {
    border: 1px solid tomato;
    background-color: tomato;
    border-radius: 10px;
    margin-top: 10px;
    cursor: pointer;
}

.error {
    color: red;
    font-family: 'Courier New', Courier, monospace;
    display: block;
    margin-top: 10px;
}

.show-msg {
    color: rgb(51, 2, 246);
    display: block;
    margin-top: 10px;
}Explanation OF Code for how to use DropzoneJS in PHP
- body {..}: The CSS code for the
<body>element styles it to occupy the full viewport height and width, ensuring a centered layout for all content. It sets a linear gradient background transitioning from pink to white, creating a soft and inviting aesthetic. By using Flexbox, the code not only centers the content both vertically and horizontally but also allows for easy adjustments to the layout, making it responsive to different screen sizes. - form{..}: The CSS code for the <form> element applies a flexible layout that arranges its child elements in a vertical column. By using display: flex, the form utilizes Flexbox, which simplifies the alignment and distribution of its contents. The flex-direction: column property stacks the child elements vertically. Additionally, align-items: center centers these elements horizontally within the form.
- input[type=”text”]{…}: In this code, by setting width: 80%, the input fields will occupy 80% of the parent container’s width, allowing for responsive adjustments on different screen sizes. The max-width: 600px ensures that the input field does not exceed 600 pixels in width. Additionally, margin-bottom: 20px adds spacing below each text input, creating a clear separation between form elements.
- input[type=”submit”]{..} : The
border: 1px solid tomatocreates a solid border in a vibrant tomato color. Thebackground-color: tomatofill the button with the same eye-catching color, making it stand out on the page. Theborder-radius: 10pxsoftens the corners, providing a modern and approachable look. Addingmargin-top: 10pxcreates space above the button. Finally, thecursor: pointerchanges the cursor to a hand icon when hovering over the button, indicating to users that it is clickable. - .error{..}: By setting color: red, the text stands out as a warning or alert, drawing attention to any issues that need to be addressed. The
font-family: 'Courier New', Courier, monospacegives the error message a distinctive typewriter-style font. Thedisplay: blockproperty ensures that each error message occupies its own line. Finally,margin-top: 10pxadd space above the error message. - .show-msg{…}: By setting color: rgb(51, 2, 246);, the text appears in a bright green hue, which is often associated with positive feedback or confirmation, helping users easily recognize successful actions. The display: block property ensures that each message occupies its line. Additionally, margin-top: 10px adds space above the message.
Bootstrap’s responsive design features ensure the upload area looks great on all devices.
JQUERY CODE for how to use DropzoneJS in PHP:
Dropzone.options.myDropzone = {
    url: "show-img.php",
    method: "post",
    paramName: "file",
    autoProcessQueue: false,
    addRemoveLinks: true,
    maxFileSize: 1,
    acceptedFiles: '.png,.jpg,.jpeg',
    maxFiles: 1,
    dictDefaultMessage: 'Drop or Drag your image',
    init: function () {
        var myDropzone = this;
        $('#myForm').on('submit', function(e) {
            e.preventDefault();
            var fname = $('#fname').val();
            var hasError = false;
            if (fname === '') {
                $('.error-name').text('Please Enter Your Name');
                hasError = true;
            } else if (/\d/.test(fname)) {
                $('.error-name').text('Name should not contain any number');
                hasError = true;
            } else {
                $('.error-name').text('');
                $('.show-name').text(fname);
            }
            if (hasError) {
                return;
            }
            if (myDropzone.getQueuedFiles().length > 0) {
                myDropzone.processQueue();
            } else {
                $('.error-img').text("Please upload an image");
            }
        });
        myDropzone.on('error', function(file, response) {
            console.log('Error:', response);
        });
        myDropzone.on('success', function(file, response) {
            if (response.success) {
                $('.error-img').text('');
                $('.show-img').text('File uploaded successfully');
            } else {
                $('.error-img').text(response.message);
                myDropzone.removeFile(file);
            }
        });
    }
};Explanation Of Code for how to use DropzoneJS in PHP:
- Dropzone Options:
url: "show-img.php": Sets the endpoint where uploaded files are sent.method:"post": Specifies that the form data will be sent using the POST method.paramName: "file": Names the parameter for the uploaded file, which the server will use to access the file data.autoProcessQueue: false: Prevents automatic uploading of files upon selection, allowing for manual control.addRemoveLinks: true: Enables links for removing uploaded files from the Dropzone.maxFileSize: 1: Limits the file size to 1 MB.acceptedFiles: '.png,.jpg,.jpeg': Restricts uploads to PNG, JPG, and JPEG file formats.maxFiles: 1: Allows only one file to be uploaded at a time.dictDefaultMessage: 'Drop or Drag your image': Sets the default message displayed in the Dropzone area.
- Initialization Function:
init: function () {...}: Defines an initialization function for the Dropzone instance.
- Form Submission Handling: The code listens for the form’s submit event, preventing the default action to handle validation.
- It retrieves the value of the name input field and checks for errors:
- If the name is empty, an error message is displayed.
- If the name contains numbers, another error message is shown.
- If valid, the success message is displayed with the entered name.
- If there are no errors and a file is queued,
myDropzone.processQueue()is called to upload the file. If no file is queued, an error message prompts the user to upload an image.
- It retrieves the value of the name input field and checks for errors:
- Dropzone Event Listeners:
myDropzone.on('error', function(file, response) {...}): Handles errors during the upload process, logging the response to the console.myDropzone.on('success', function(file, response) {...}): Checks the server’s response upon a successful upload:- If the upload is successful, it clears any error messages and displays a success message.
- If not successful, it shows an error message and removes the failed file from the Dropzone.
Drag-and-Drop Upload: Dropzone.js enables easy drag-and-drop uploads.
Also, this integration ensures smooth communication between user inputs and server processing.
PHP Script for Handling Image Uploads with JSON Response:
<?php
header('Content-Type: application/json');
$response = ['success' => false, 'message' => ''];
if (!empty($_FILES)) {
    if (isset($_FILES['file']) && $_FILES['file']['error'] === UPLOAD_ERR_OK) {
        $file = $_FILES['file'];
        $uploadDir = './assests/images/';
        $uploadFile = $uploadDir . basename($file['name']);
        $fileType = mime_content_type($file['tmp_name']);
        if ($file['size'] > 1000000) {
            $response['message'] = "Image size is too large";
        }  elseif (move_uploaded_file($file['tmp_name'], $uploadFile)) {
            $response['success'] = true;
            $response['message'] = "File uploaded successfully";
        } else {
            $response['message'] = "Failed to move uploaded file";
        }
    } else {
        $response['message'] = "File upload error: " . $_FILES['file']['error'];
    }
} else {
    $response['message'] = "No file uploaded";
}
echo json_encode($response);
?>Explanation Of Code:
- header(‘Content-Type: application/json’);: This line sets the content type of the response to JSON, indicating that the output will be in JSON format.
- $response = [‘success’ => false, ‘message’ => ”]; An associative array is initialized to hold the response data, starting with
successset tofalseand an empty message. - if (!empty($_FILES)) { …}:
- This code segment processes file uploads by first checking if any files have been uploaded.
- If files are present, it verifies that the specific file input named
fileexists and that there were no errors during the upload. - Then, the uploaded file is assigned to a variable, and the target upload directory is defined. The script then constructs the full path for the uploaded file.
- It checks if the file size exceeds 1 MB, returning an error message if it does.
- If the file size is acceptable, the script attempts to move the uploaded file from its temporary location to the designated directory.
- If successful, a success message is returned; otherwise, an error message indicates the failure to move the file.
- If no files were uploaded or if there were any errors during the upload, appropriate error messages are generated to provide feedback on the process.
- File validation ensures only acceptable formats and sizes are processed.
json_encode($response);: The lineecho json_encode($response);converts the$responseassociative array into a JSON string and outputs it to the client.
Using PHP for file uploads ensures server-side validation and processing.
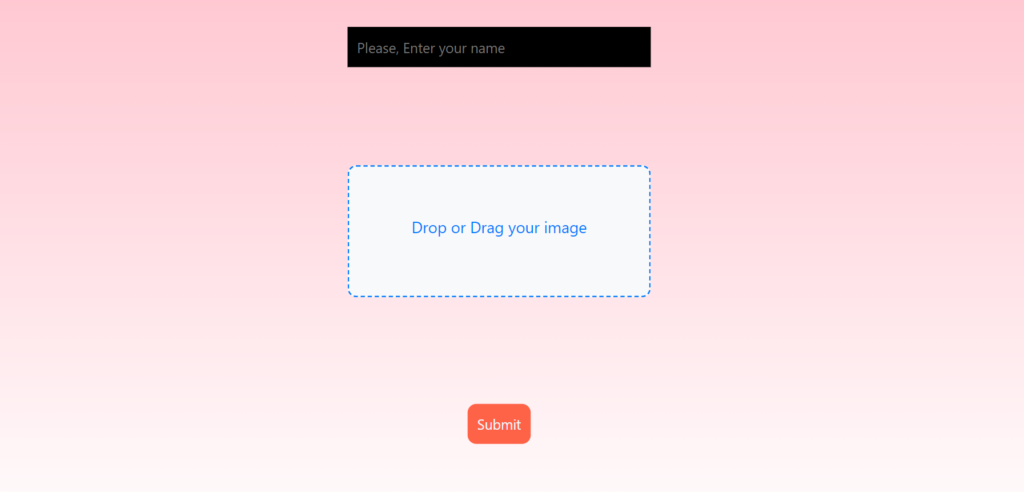
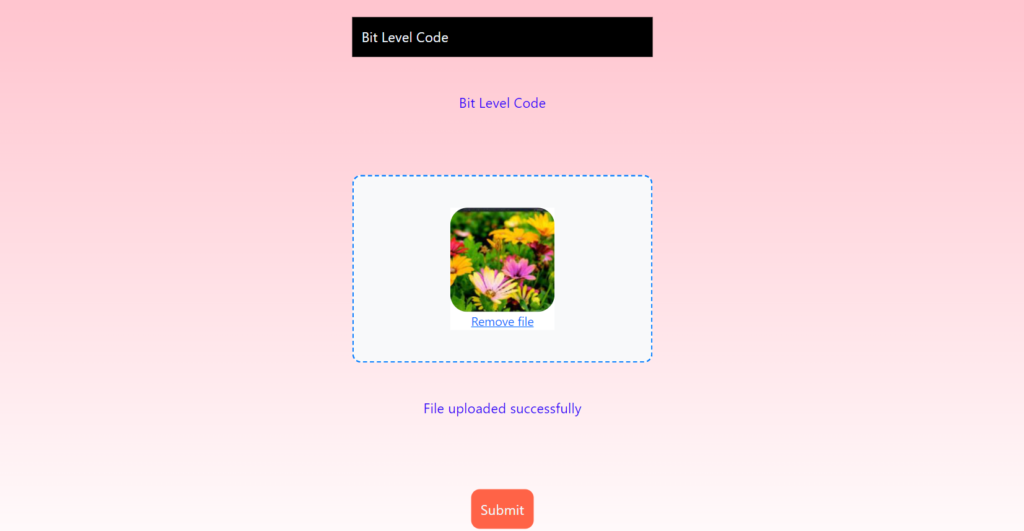
Output:
Before Uploading The image:

After Uploading The Image:

Related Post:
>> 5 Ways to Short an Array in PHP Without Using Inbuilt Functions
Conclusion:
In conclusion, the provided code effectively implements a robust image upload feature using PHP and Dropzone.js, enhancing user experience with real-time feedback. The front-end JavaScript manages file selection and form validation, ensuring users provide valid input before uploading. The PHP backend processes the upload, checks for errors, and responds with clear messages in JSON format, allowing for seamless interaction with the client-side code. By combining these technologies, the solution offers a user-friendly interface for uploading images while ensuring that all necessary validations are in place to maintain data integrity and provide informative responses to users. Overall, this implementation exemplifies best practices in web development, fostering a smooth and engaging user experience.
This implementation enhances user experience by providing real-time feedback.
Happy Coding !!


